How I turned my old Stereo Amp Into A Smart Spotify and AirPlay Player
Smart everything is the new standard for all kinds of devices, even in the good old HiFi amplifier segment. New amps have fancy connectivity like WiFi, Soptify and AirPlay support built-in. But why buy a whole new amp if your good old HiFi stereo still works just fine?
In this project I use a Raspberry Pi as a smart audio source that can stream music and podcasts with Spotify Connect and audio directly from iOS devices via AirPlay. In addition to that the Pi is able to automatically turn on the stereo amplifier and change the input channel via infrared when audio starts playing.
For this project I used the following components:
- Raspberry Pi Zero
- Power Supply for Raspberry Pi
- MicroSD Card
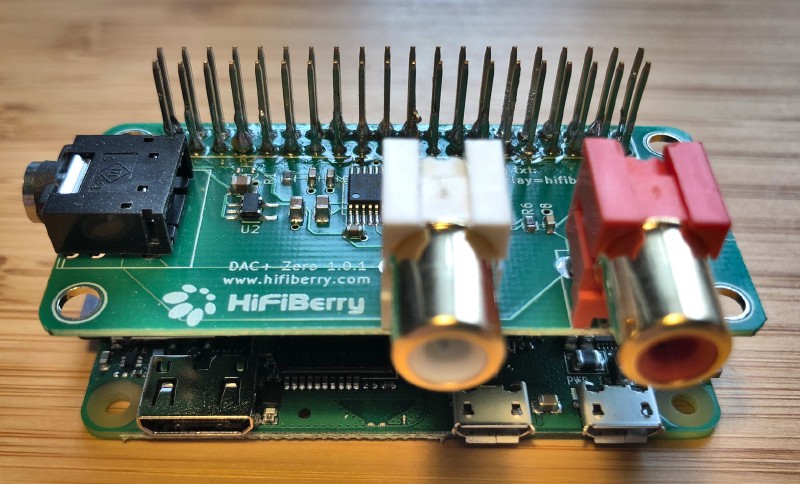
- HiFiBerry DAC+ Zero
- Stacking Header für Raspberry Pi
- Prototyping Board für Raspberry Pi Zero
- IR LED
- IR Reciever
- Philips Hue compatible wall plug (i.e. Osram SMART+ Plug)
1. Preperation
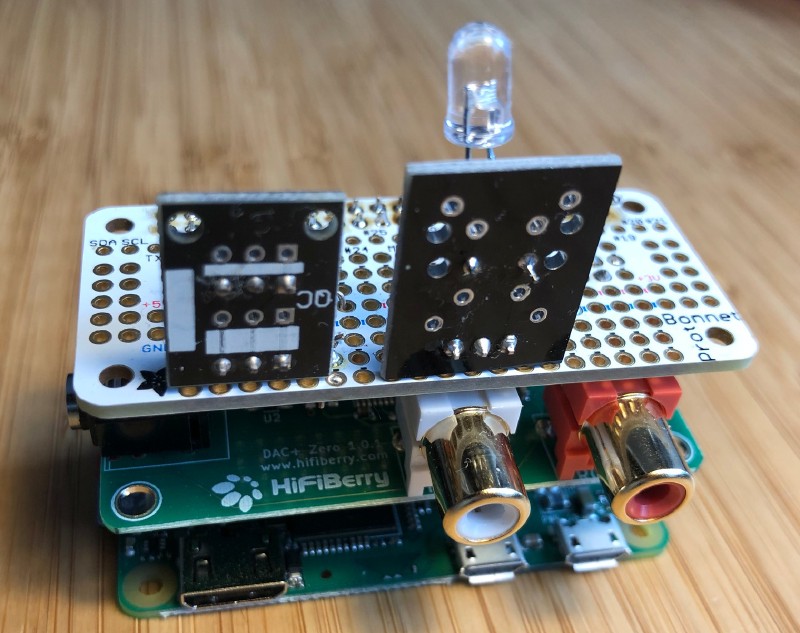
First of all, some components need to be assembeled. Solder a pin header to the Raspberry Pi and the prototyping board. Solder the stacking header to the HiFiBerry board and stack the board on top of the Pi.
Use a Philips Hue compatible smart wall plug to connect the amplifier to a power outlet. Make sure that the amplifier is not in standby when the wall plug is turned on.
Use a tool like Etcher to flash the ‘Lite’ version of Raspbian OS on the SD card.
Next, we need to setup the WiFi-Connection and enable SSH access, so we can reach the Pi once it is powered up. To do this, mount the SD Card on your computer and add the following files to the boot partition:
Add the file wpa_supplicant.conf with the following contents and change the country, ssid and psk (WiFi Password) variables accordingly. This assumes your Access Point uses WPA-PSK-Encryption. :
country=DE
ctrl_interface=DIR=/var/run/wpa_supplicant GROUP=netdev
update_config=1
network={
     ssid="WiFi SSID"
     scan_ssid=1
     psk="WiFi Password"
     key_mgmt=WPA-PSK
}
Second, add an empty file named SSH to the root partition. This enables remote SSH access.
Now insert the microSD card into the Pi, connect it to power via MicroUSB, find the Pi’s IP Adress in your Access Point admin panel and ssh into the system using Putty (Windows) or the terminal command ssh pi@ip-of-your-pi on mac and linux.
2. Software for Audio playback: raspotify and shairport sync
For spotify playback we use the raspotify library. This allows us to control music via the Spotify mobile or desktop app using the Spotify Connect feature. The shairport-sync library is used as an AirPlay reciever.
raspotify
To install raspotify, simply run this command on your Pi:
curl -sL https://dtcooper.github.io/raspotify/install.sh | sh
Now we need to configure a couple of things for raspotify. Edit the file /etc/default/raspotify, uncomment the following line and enter your spotify credentials:
OPTIONS="--username <USERNAME> --password <PASSWORD>"
For optimal audio quality, uncomment the following line and set the bitrate to 320:
BITRATE="320"
shairport-sync
For shairport-sync, follow this guide to download, build and install the package on the Pi.
Stack the assembled HiFiberry board onto the Raspberry Pi Zero. To test the audio output, connect your stereo amp to the HiFiBerry’s chinch connectors or connect a pair of headphones to the 3.5 mm jack. In the Spotify mobile app tap the Spotify Connect Button in the bottom left corner, choose the raspotify player as a target and play some music. The Raspberry Pi should now output the audio.
3. Hardware: Infrared I/O
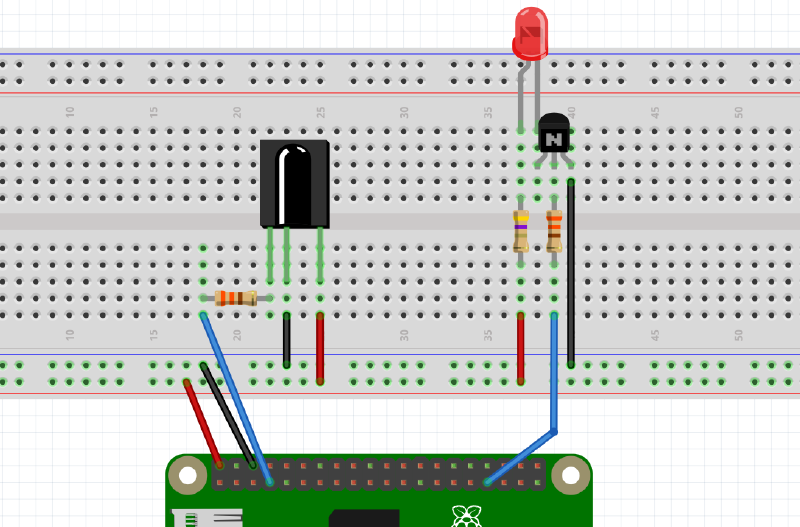
Almost all stereo amps use the infrared interface for remote controls. We can make use of that IR protocol and send IR signals ourselves with an IR LED.
See the following schematic of how to connect an IR LED to the Pi:
The prototyping board is en easy way to quickly build up a circuit in a small form factor. The board from Adafriut I used conveniently breaks out most of the Pi’s GIPO pins into a single row. Like in a breadboard, two center lines of holes are for ground and +5V/ +3.3V respectively and outside those lines there are rows of three holes connected together.
Do not use GPIO pins 18-21 (pins 12, 35, 38 and 40) for connecting the IR LED or the reciver module, as those pins are used by the HiFiBerry board.
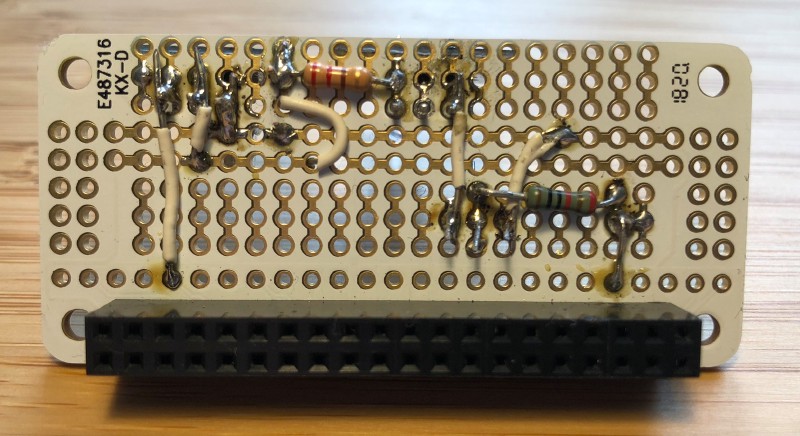
First, lay out the components in a way that minimizes the need of extra cable connectors. Solder the components in place first and then use cables to connect components together and to the Pi’s GPIO pins.
4. Send IR signals with lirc
For sending IR signals we use the lirc package for linux. To set it up on the pi, follow these steps from prasanthj’s gist for getting lirc to run on Raspbian Strech.
In the /etc/modules and /boot/config.txt files, set the gpio_out_pin to the pin you used to connect the IR LED. For the IR reciever, set gpio_in_pin to the respective pin.
To save the IR signals that control the channel input of the amp use lirc’s irrecord command to record the IR commands from the amp remote:
sudo irrecord
Folow the steps to record IR signals and name the buttons pressed. (Tip: run sudo irrecord -l to see the possible key names.)
This should create a new remote configuration file in /etc/lirc/lircd.conf.d.
Test this out by transmitting the recorded signal using the following command:
irsend SEND_ONCE <device-name> <key-name>
5. Putting it all together with Python scripts
Now that audio playback works and lirc is up and running, it’s time to put it all together using Python scripts. We need to address the following problems:
a) toggle Hue compatible wall plug with phue
To turn on the smart wall plug the stereo amplifier is connected to, I use the phue library for Python. Download phue.py and put it into a project directory on the Pi.
Visit https://www.meethue.com/api/nupnp to find your Hue Bridge’s IP address as the valeu for internalipaddress.
In the project directory on the Pi, open the Python interpreter with the terminal command python3. Import phue with the command from phue import Bridge.
Now press the connect button on the Hue Bridge and connect to the bridge with
b = Bridge('IP-OF-HUE-BRIDGE')
b.connect()
Type b.get_api() to test the connection. This should return the dictionary of the complete content of the Hue api including all devices. Find the smart wall plug id in the ’lights’ dictionary and note the key (i.e. ‘5’). (Tip: Use pprint to pretty-print the output of get_api())
Now to test switching the wall plug on and off, type
b.set_light(<wall plug ID>,'on', True)
and
b.set_light(<wall plug ID>,'on', False)
**b) detect audio playback**
Now how can we detect when audio is playing? In Raspbian the /proc/asound/card0/pcm0p/sub0/status file contains status information about the audio device. closed means there is no audio running and RUNNING means audio is currently playing:

**c) main Python script**
Now we put everything together in this Python script. In an infinite while-loop the script checks if audio is playing. If there is audio playback, the wall plug is turned on using the phue’s set_light function, followed by sending an IR signal to switch the channel on the amp using the lirc SEND_ONCE command.
Configuration for this script:
- standby: after audio playback stops, how many seconds to wait until the amp is shut down
- Hue config:
plugId: Id of the Hue smart wall plughueBridgeIp: Hue Bridge IP (string)
- lirc config:
remoteName: Name of remote for saved IR codesaudioStart: IR Key Signal to send when playback startsaudioStop: IR Key Signal to send when playback stops
Save this script in the project folder (phue.py needs to be in the same folder). Run the script with the following command and try to stream music via Spotify or AirPlay to see if everything works.
python3 smartAmp.py
If there is an error about phue not being able to connect to the Hue Bridge, make sure to push the Hue Bridge connect button before running the script again.
d) run script on startup
We can make the Python script run on startup using a systemd service. Create the service by running
sudo systemctl edit --force --full smartAmp.service
and paste the following contents and substitute the path to the smartAmp script for PATH-TO-SCRIPT in ExecStart:
[Unit]
Description=SmartAmp Service
Wants=network-online.target
After=network-online.target

[Service]
Type=simple
User=pi
WorkingDirectory=/home/pi
ExecStart=/usr/bin/python3 PATH-TO-SCRIPT

[Install]
WantedBy=multi-user.target
Close the editor and enable the service:
sudo systemctl enable smartAmp
After a reboot the script should be startet automatically.
sudo reboot
optional add-ons
- With the IR reciever connected to the Raspberry Pi you are able to use a regular IR remote to send signals to the Pi itself. The remote can be used to run scripts on the Pi, for example to switch on a Hue compatible wall plug.